Thursday, April 23, 2015

Homemade Ice Cream

My dad recently celebrated his 76th birthday and in our family, birthday celebrations often include homemade ice cream. Born to hardscrabble Appalachian parents, my pops grew up eating ice cream only during the winter, when snow was available to help freeze the cream while churning. He or my grandfather would hand crank the mixture while the other continued to pack snow and rock salt around the cylinder. Since the snow is gone, and I'm probably incapable of hand churning frozen cream for a half hour, I use a different method.

I've tried lots of ice cream makers: hand crank, electric crank, and an electric crank with a frozen cylinder base. I prefer the latter as the ice cream freezes faster with much smaller ice crystals. The texture is smoother and the frozen cylinder eliminates the need for ice and rock salt. I store the cylinder in the freezer so it's ready whenever we want ice cream.

I usually make vanilla bean ice cream as it's versatile enough to serve with birthday cake, shortcake and fruit pies (standard dessert fare in our family). This base can easily be dressed up with the addition of a fudge ripple, chopped nuts, fruit puree or bits of candy.


Cool the ice cream base complete before freezing. Churning will slow
and the ice cream will become thick, creamy and increase 
in volume. This took about 40 minutes of churning.

After churning, remove the ice cream to a container with a tight fitting lid and place
in the freezer to ripen. I usually make the ice cream the day before I serve it.


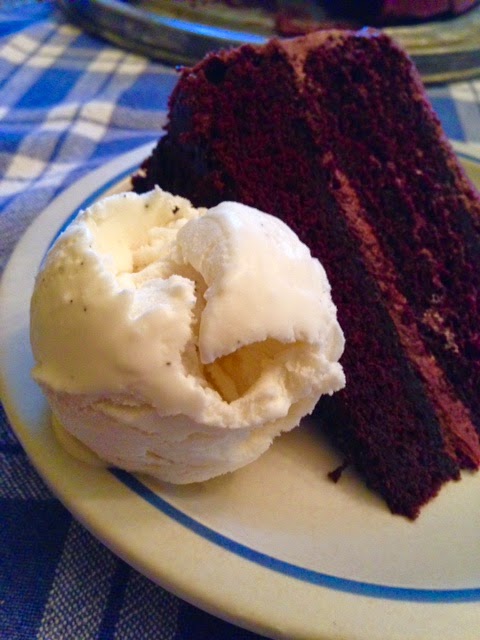
Perfect birthday treat: Vanilla bean ice cream with double layer chocolate cake.

Vanilla Ice Cream
From The Perfect Scoop
Makes 1 quart
Because this base doesn't include egg yolks, it's a bit lighter tasting and comes together quick.

2 cups heavy cream
1 cup whole milk
3/4 cup sugar
pinch of salt
1 vanilla bean, split lengthwise
3/4 tsp vanilla extract

Place one cup cream in a small saucepan. Add sugar and salt. Scrape seeds from vanilla bean into saucepan. Add bean pod. Warm over medium heat, stirring, just until sugar is dissolved. Remove from heat, add remaining cream, milk and extract. Chill thoroughly.

When ready to churn, remove bean pod and freeze mixture in ice cream maker according to manufacturer's directions.


Saturday, April 18, 2015

Spring Flower Beds

Most of our gardening beds are dedicated to edibles, but we do have a few flower beds. Admittedly, I'm no expert on growing flowers and know even less about garden design. We've lived in this house almost nine years and, with the exception of the front beds surrounding the house, the flower beds are a mish-mosh of successes and failures (most failures are removed or die on their own). I gave in and had a professional create a plan the front beds. I was tired of the yard looking like a couple of college kids lived here.

These are the first pics from this spring. It might not look like much, but things are growing. So far, we've planted a few summer bulbs and plants that are frost tolerant. Here in zone 6A, we're about three weeks from the frost free date.

During the summer I spend a lot time tending the edible garden and preserving the food.  I need ornamental plants that are easy to grow and look good without much care. After the initial spring cleaning, I might weed just once more through the growing season.

Have planting suggestions? I welcome your advice. Feel free to leave a comment below.


This bed is right next to the drive. We're removing the railroad ties and tearing up the poured walkway on the bottom. The bed has several peony bushes, dianthus, volunteer black columbines, spring bulbs, lilies and a mum that probably won't make it. I pulled out a lot of spider wort. And I planted an elephant ear, because I needed something tall to anchor the bed. And they were in a huge pile at my garden center that I couldn't resist.

Have you planted spider wort? It looks so beautiful in the catalog. But it never looked good in the bed. And it TAKES OVER. It's like mint only you can't eat it. See all those roots? They run for yards. We have an annual spring ritual: Pull the Wort!! We've worked to remove it for the past three years.  The wort persists. 

This is the kidney bed near the road.  The shrub next to the daffodil is loaded with small pink flowers. I can't recall the name but I love it. There's also an astilbe on the far left and a just planted hydrangea on the far right. 

The herb bed just off the kitchen includes (bottom to top) oregano, chives, parsley, rosemary, cilantro, lavender and sage. We'll plant basil next month after danger of frost passes. Lemon grass will be planted in the nearby kitchen garden.


If I'm going to find a dead raccoon on the property, I'm pretty sure it'll be in this bed. Despite my efforts, this plot never looks pretty. It grows near a big maple that shades it in the summer, and covers it in deep leaf mulch in the winter. It stays wet, doesn't get much sun and usually includes a patch of poison ivy. I'm not a hosta fan so I'm on a constant search for interesting shade plants. Right now the plot includes coral bells, woodruff, bleeding heart, phlox and other things that never bloom. So they're unidentifiable to me. 

I'll be posting updated photos as the beds fill out. Hope you'll check back!


Sunday, April 12, 2015

Homemade English Muffins

English muffins are one of my favorite breakfast treats - more special (and tastier) than toast. I like an English muffin well toasted with lost of crispy, craggy goodness to catch butter, homemade jam or honey. I started making my own when I found some commercial varieties to be gummy without much flavor.

I like this recipe because it uses a starter with a long (and flexible) rise time, which helps develop flavor. It's also reliable - I've used the recipe several times with consistent results. The muffins can be dry-fried (325 degree ungreased skillet for about 10 minutes per side), but this method sometimes produces a muffin with a doughy center. Baking always produces a fully cooked muffin.

I use muffin rings, available at most baking supply stores or online retailers. Muffins baked in rings are straight sided, easy to cut and fit well in the toaster (and are perfectly round for pretty egg sandwiches). You can make free-form muffins that are just as tasty. They just won't rise as high.

Combine starter ingredients and leave at room temperature for at
least four hours and up to 16 hours. Starter will be bubbly when it's ready.
 This starter sat on the counter for seven hours.

Combine starter with dough ingredients, beating for 6-8 minutes. Cover and let rise 1 hour.

I have a few English muffin rings. While they're not
a necessity, I like uniform muffins with straight sides. 

Grease the rings and place on a lined baking sheet. Fill with scant 1/4 cup batter.
 I've lost a few rings, so some muffins are free form. I should've made 12,
rather than 11 muffins. Some of the rings are too full (see finished product).
After they rise, place a second baking sheet on top of the rings to prevent doming
during baking. Do not place second pan on top of free-form muffins. 

Left to right: baked without the ring (free form); baked with the ring and the
pan on top - notice the excess dough that rose over the top of the ring;
and baked with a ring without a pan on top - the domed top will
have to be cut off to fit in the toaster.

Crispy, craggy and delish. Perfect with a bit of butter or a great base for an egg sandwich.


English Muffins
Adapted from The King Arthur Flour Bakers Companion

Starter
1 1/2 cups all purpose flour
3/4 cup water
1/8 tsp instant yeast

Dough
1 3/4 cup all purpose flour
2 Tbsp cornstarch
1 tsp instant yeast
1 tsp salt
2 Tbsp sugar
2 tsp baking powder
2 Tbsp butter, melted
3/4 cup warm milk
Cornmeal for sprinkling

Make the starter
Mix flour, water and yeast in a medium bowl to form a smooth batter. Cover and leave at room temp at least 4 hours and up to 16 hours. The batter will be puffy and full of holes when it's ready to use.

Make the dough
In a large bowl, combine starter and all dough ingredients. Mix 6-8 minutes. Cover and let rise until doubled, about 1 hour.

Shape
Spray 12 English muffin rings with nonstick spray and place on a parchment lined baking sheet sprinkled with cornmeal. If you don't have rings, make free form muffins by dropping batter onto pan.

Stir dough and drop scant 1/4 cup of dough into each ring (resist the urge to overfill the rings). Smooth dough with fingers dipped in water. Sprinkle with cornmeal. Cover the pan and let rise until muffins have grown by at least a third, up to 1 hour. Preheat oven to 350 degrees.

Bake
If you're using rings, place a clean baking sheet atop the muffins to keep muffins flat on both sides so they'll fit in the toaster. Bake for 25 minutes. Remove from oven and cool completely before toasting.


Thursday, April 9, 2015

Freezer Beef

Most of our meat comes from farmer friends and our local processor, including sides of pork, whole chickens and cuts of beef. This year, as investors in a herd of show cattle, we added beef from our herd to the freezer.

Most of our cattle remain in the herd for breeding purposes or are sold to folks interested in showing cattle. Recently a heifer fell in the pasture, damaging her leg. While we hated making a tough decision, we were grateful that the meat wouldn't be wasted.

Since the early days of our marriage, we've purchased freezer meat. I like it for several reasons:

  • A stocked freezer is beautiful - we always have a start to dinner in the house.
  • It's cheaper than buying retail.  
  • I can talk with the butcher to get the cuts and portion sizes I want. 
  • I like knowing where the meat came from and supporting local producers. 
Freezer meat can be purchased directly from the farmer or a local butcher. Additionally, many county fairs include auctions of animals raised by local kids as part of their FFA or 4-H project. You can buy an animal at the sale and have the processor transport and butcher the animal to your specs.

So how much meat should you expect? Hanging weight is the carcass weight, or the weight of the animal after slaughter. Each species dresses out slightly different. For beef:

Live Weight x .6 = Hanging Weight
Hanging Weight x .6 = take home meat

Our animal had a live weight of around 1,000 lbs. so the hanging weight was 600 lbs. Take home meat is around 60 percent of the hanging weight. In our case that was about 300 lbs (less than average due to the damaged leg). We split the meat evenly with our herd partners, and took home about 150 pounds of steaks, roasts and ground beef.

The whole 150 lbs fit in our large chest freezer, which also holds frozen garden
produce and a few pounds of pork left from the hog. And some cookies.

Meat comes packaged in freezer paper. Some butchers use vacuum packages.

Bacon cheddar cheeseburger. Maybe I'll blog a year of cheeseburgers?


Wednesday, April 1, 2015

Spring Garden Goings-On

After a winter that stuck around way too long, spring finally arrived (although I did notice a chance of snow in the forecast). With the warmer temperatures, I've noticed sudden growth in the garden. Emerging are a few perennial plants that come back each year. We haven't done any clean-up or bed prep as it's still pretty wet. Traipsing through the plots now might cause soil compaction.

Annuals will be planted next month after danger of frost. The majority of our garden is grown from seeds with the rest, mostly peppers and tomatoes, purchased as plant starts from our local greenhouse. The frost free date for our area is around the middle of May. Find your frost free date here.


Our winter rye, planted last fall, will continue to grow until it's terminated (crimped, mowed, turned under). Cover crops specialists suggest you should avoid turning the cover crop under as tilling ruins the soil structure. We have ongoing conversations about tilling. Seems we have a hard time letting go of our desire for a "tidy" garden, concerns about weed suppression, etc. Hoping to experiment more this year. 

Pretty happy that the peach trees are budding. We lost a tree to the polar vortex in 2014 and with a similarly rough 2015 winter, I expected to lose another tree. But even in temperate winters, we've lost peach trees. They're finicky, and maybe not well suited to this climate. In any case, I'm always happy to see the buds appear. It lives!! 

Rhubarb is my favorite vegetable that acts like a fruit. It's one of the first foods we harvest each spring and gets preservation season underway with rhubarb sauce (freezer) and strawberry-rhubarb jam (canned). The bright, citrusy flavor is perfect in pies, cobblers and other baked goods. 

Chives are mature enough to cut! Chives are perfect when I want a hint of onion and they add a fresh flavor to dips and marinades. I think we'll have loaded potato skins topped with sour cream and chives this weekend!

Horseradish is just poking out of the ground. This might be the easiest thing we grow. It reliably comes back each year and one root provides us with flavor all year long. It's easy to grow and easy to preserve.


Not much to look at, but the blackberry canes are cool without their foliage. Like thorny medieval weapons jutting out of the ground. These native plants are tolerant of all kind of weather and produce a ton of berries. We've considered growing the thornless variety but they just don't do as well as the thorned variety. So we're careful when we pick.

Although cilantro isn't really a perennial, the plant does reseed itself. It fades during the heat of the summer and thrives in cooler weather. We'll continue to sow seeds throughout the growing season so we always have a supply of fresh cilantro. This plant is a volunteer from last year's seeds.

The strawberries are popping up. This is the second year for this stand, so we're hoping for a big harvest. This bed grows near (and sometimes into) the asparagus, which hasn't sprouted yet. Not too much of a concern as the asparagus is taller. Incidental companion planting.

Oregano is just peeking out. Cleaning up the plant will encourage new growth, and since it's in a raised bed, I don't have to be concerned with soil compaction. Just need to get some basil plants and we'll be ready for our fave pasta dish!
What's coming up in your garden? Leave a comment and let me know!