Tuesday, September 30, 2014

King Arthur Flour Baker's Harvest Conference

Recently I traveled to the King Arthur Flour Baking Education Center in Norwich, VT to attend the Baker's Harvest Conference. The two-day event included a variety of hands-on bread and pastry classes, panel discussions and bakery crawls. Attendees included a range of novice, experienced and professional bakers.

This was my second year attending the conference and I selected classes focused on bread baking and shaping, including instruction using a wood-fired oven. I make most of the bread we eat at home and wanted to learn new techniques, get better at making artisan loaves, and finally learn how to correctly slash dough using a lame!

While I accomplished two of those goals (still practicing the slash), I learned a tenet of artisan bread baking: time equals flavor. While fine-textured fortified bread relies on eggs, milk, butter or other ingredients for flavor (and have a short rise time), the ingredients in the bread I made included a pre-ferment (starter), yeast, flour, salt and water. Flavor and texture develop over time (up to three days for pizza crust).

Classes

Pretzels & Bagels from the Wood-Fired Oven
I wouldn't have thought of baking either of these items in a wood-fired oven but the result was chewy on the inside and crispy on the outside with tasty charred bits. Both pretzel and bagel doughs were made the day prior and allowed to ferment in the fridge overnight, then shaped. Bagels were boiled for 1-2 minutes then baked. Pretzels were dipped in a lye solution then baked.

Bagels removed from boiling water solution,
topped with seeds then placed on a cornmeal-dusted peel.
A sesame bagel fresh from the wood-fired oven.


Traditional pretzels just out of the oven.


Milling & Baking with Freshly Milled Flour
This class discussed the different types of grain and using fresh vs. aged flour. We also got a tour of the bakery and a primer on making decorative loaves.

Round loves rising in proofing baskets.
Instructor and KAF Baker, Martin Philip,
turns loaves out of the baskets to be
loaded into the oven.


Finished stencil.
Before baking, loaves are decorated
using a stencil and cocoa.


Bread is quickly loaded in the oven. Each door is a separate deck.
Steam is added to develop a crispy crust.

Pizza from the Wood-Fired Oven
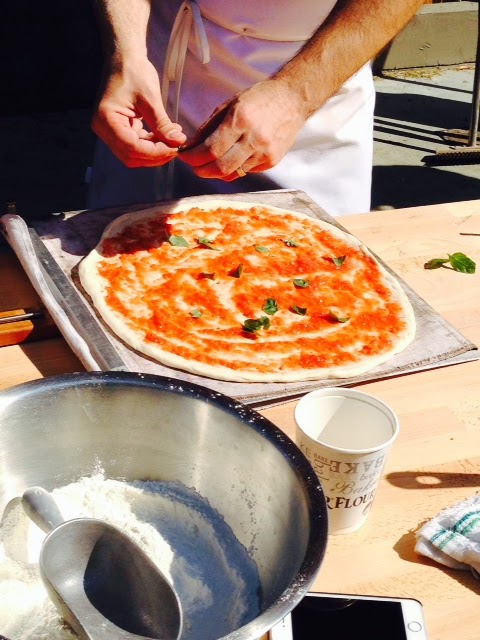
Pizza is my favorite food. So I really enjoyed this class. A lot. Dough was made up to three days prior and allowed to ferment in the fridge. It was (tossed) thin, topped with sauce and a few other toppings and baked in minutes. I sampled them all, but my favorites included the pies topped with fresh, uncooked sauce. Fresh and light.


Andrew Janjigian, Assoc Editor for
Cook's Illustrated starts with the crust.
Adding toppings.


Baked in a hot wood-fired oven for just a few minutes.
The charred crust was my favorite.


Bakery Breads
Perfect baguettes are a baker's holy grail. This class taught me how to handle, roll and bake in a home oven. And I learned to curb my desire to add too much flour to aid in shaping. If repeating a task 10,000 times makes you an expert, I only have 9,998 more loaves to make.

See the baker's hands? That's how to roll a baguette. Fingertips and heels of the hand should remain on the bench. It's being done correctly if you can hear a "swooshing" sound as your hands remain in contact with the bench as you roll.

Best part of the experience? Baking for two days with my nephew, Kyle!


My goal is to practice by making artisan loaves (or bagels/pretzels) a couple times each week for a year. And envision my backyard with a wood-fired oven. What food skills are you trying to perfect?

Baguettes
From King Arthur Flour

Poolish:
1 1/4 cups (5 1/4 oz) all-purpose flour
5/8 cup (5 1/4 oz) cool water
pinch of yeast

Final Dough:
2 3/4 cups (11 oz) all-purpose flour
3/4 cup (6 oz) cool water
1 1/2 teaspoon yeast
1 1/2 teaspoon salt

For Poolish: The night before you're ready to bake, combine poolish ingredients until blended. Cover bowl tightly and let poolish ferment for about 15 hours at 70 degrees. When it's ripe, the poolish should be very bubbly and fragrant.

For Final Dough: When poolish is ripe, add the flour, water, yeast and salt and stir to combine into a cohesive mass. The dough should be somewhat sticky, so you may need to add a bit more water.

Turn the dough onto a smooth, unfloured surface to knead. Resist the temptation to add more flour. After a short time the dough will smooth out and feel less sticky. (You can also knead on the medium speed of a mixer for 3-4 minutes.) When the dough is smooth and elastic, return to the bowl and cover well to rise. Let rise 1 1/2 hours folding once after 45 minutes (or more often of the dough is very slack).

Divide dough in two and pre-form rounds. Lest rest, covered, for 20 minutes. Shape into baguettes. Place shaped bread, seam side down on a couche or a lightly floured tea towel and let proof, covered, until not quite doubled 30-40 minutes. While dough is proofing, preheat oven and baking stone to 500 degrees.

Place the risen loaves on parchment paper, on a peel and slash. Slide baguettes onto the stone. Fill the oven with steam (place cast iron or other pan on lower rack during preheating. Pour boiling water quickly into pan after placing loaves on stone). Bake until the crust is well caramelized and the sides are very firm, about 25 minutes total.


Saturday, September 13, 2014

Crispy Eggplant Parmesan

Despite the unusual growing season, our eggplants produced decent fruit this year. While we occasionally grill or saute eggplant, one of my favorite ways to prepare this vegetable is in eggplant parmesan. 

I know this is not the traditional way of preparing eggplant parmesan. Rather than layering the veg between marinara sauce, I prefer to serve most of the sauce as an accompaniment on the side. That way, I preserve the light, crispy coating.

Wash eggplant and cut into 1/2 inch thick round slices.

Place slices in a colander, sprinkle with salt and let drain for 5 minutes.


Coat slices by dredging in flour, then egg/milk mixture, then panko/cheese. Place on a rack.
When all slices are coated. Heat the marinara. I had leftover tomatoes from
the previous day's canning. I sauteed onions and added fresh garlic, basil, oregano, rosemary, salt, pepper and pinch of sugar to a quart of chopped skinned tomatoes (I made more sauce than the recipe required).
Heat oil to 350 degrees and fry eggplant slices for 2 minutes on each side.
Remove to a wire rack until all slices are cooked.
If you're serving with pasta, boil the pasta water.
When all the slices are cooked, spread a thin layer of sauce over the
bottom of a baking dish. Shingle the eggplant in a single layer on top of the sauce.
Sprinkle with mozzarella.
Place under broiler for 5-7 minutes until cheese is bubbly and brown.
Meanwhile, cook the pasta.
Serve with pasta and additional sauce.

Eggplant Parmesan
Adapted from Chow.com
24 1/2-inch thick round slices of eggplant
Kosher salt
1 cup all-purpose flour
Freshly ground black pepper
2 large eggs, beaten
1/2 cup milk
1 1/2 cups panko (I like whole grain panko)
1/2 cup finely grated Parmigiano-Reggiano cheese
Oil for frying (I used peanut oil)
1 1/2 cups warm marinara sauce plus more for serving (jarred or homemade)
8 oz shredded mozzarella.

Position a rack in middle of the oven and heat the broiler to low. Place the eggplant slices in a colander set in the sink or over a bowl, sprinkle generously with salt, toss to combine, and set aside to drain for about 5 minutes.

Place the flour in a wide, shallow dish and season generously with salt and pepper. Combine the eggs and milk in another shallow dish and set aside; mix the panko and cheese together in a third shallow dish. 
Remove the eggplant slices from the colander and pat dry with paper towels. Bread the eggplant by coating a few slices in the flour mixture. Shake off any excess flour, dip the slices into the egg mixture, and press them into the panko mixture; be sure to coat the slices thoroughly at each step. Set the breaded eggplant on a baking sheet and repeat with the remaining slices.

Line another baking sheet with paper towels and set a wire rack over the towels; set aside. Fill a large, straight-sided skillet or frying pan with 1 inch of the olive oil. Heat over medium-high heat until the oil reaches 350°F on a deep-fat thermometer (the oil should be shimmering but not smoking). Add about a third of the eggplant slices and fry on one side until golden brown, about 2 minutes. Carefully flip and fry the other side for another 2 minutes or until golden brown. Remove to the wire rack and repeat with the remaining eggplant.

Pour the warmed tomato sauce over the bottom of an 8-by-8-inch baking dish. Shingle eggplant slices, over the tomato sauce. Top with cheese. 
Place in the oven and broil until the cheese is melted, bubbly, and speckled with gold, about 5 to 7 minutes. Serve immediately with extra tomato sauce on the side.

Note: Instead of pasta, focaccia would also make a great accompaniment to this dish.

How do you prepare your eggplant?

Continue the conversation on Twitter
Want one-on-one preservation help? Find me on Helpouts

Monday, September 8, 2014

Join us for #CanningLive

Interested in canning? Want to talk to a canning expert live? Then join us as we live tweet the canning process on September 27, 2014 from 1pm to 3pm EST during #CanningLive.


This tweet-up party will include five avid tweeters (and food enthusiasts) gathered in my kitchen to make and preserve applesauce and apple butter. During the event, we'll tweet home canning processes, discuss equipment and provide instructions and tips plus give away prizes contributed by Ball.

In addition to myself, tweeters include: BG_Garden, HandyHelen, BethBillstrom, and MaggieGrows


Rather than a traditional chat with posted questions, the group will be tweeting while we're canning. We'll take questions and post the preservation process via real-time pictures, videos and instructions. Followers can watch the process, join in the conversation and ask questions using #CanningLive.

Find Us:
Twitter: log on and follow us by using #CanningLive

Facebook: Join the group #CanningLive

And you can win a prize!
Throughout the event we'll be giving away prizes: 
  • Coupons for a free case of any Ball canning jar
  • Ball Blue Books
  • Canning jar lifter
Prizes will be given away in a random drawing of #CanningLive participants. To qualify, you must leave a blog comment below with your twitter handle or in the #CanningLive Facebook group. If you win a prize, please respond within 24 hrs of my request for shipping information to prevent prize forfeit.  


So what are you waiting for? Register for a prize and be sure to join us for a fun day of #CanningLive! 

Follow me on Twitter

Wednesday, September 3, 2014

Tomatoes in Jars

We preserve tomatoes lots of ways: salsa, pizza sauce and dried cherry tomatoes. But plain, unseasoned (except for salt) canned tomatoes are one of the most versatile ingredients in my cupboard. With a quart of tomatoes, I can make a quick chunky pasta sauce, add flavor to soups, stews and chili, make a side of scalloped tomatoes and tenderize slow-roasted meats.

Depending on the harvest, the jars can include a variety of slicing tomatoes, paste tomatoes or a mixture of both. I prefer to process tomatoes in a boiling water-bath canner, which requires acidification of the tomatoes. Because there are so many varieties of tomatoes, with varying acid levels, the USDA recommends the addition of 2 Tbsp of commercially prepared lemon juice or 1/2 tsp citric acid to each quart of tomatoes. It's important to use bottled lemon juice as it has a 5% acidity. The acidity of fresh lemons fluctuates.

We started with just under a bushel of tomatoes, fresh picked from the garden.
Most were slicing tomatoes.

Wash tomatoes, remove core and slice an "X" in the bottom. This will help loosen peels.

Blanch tomatoes in boiling water for 30-60 seconds.

Remove tomatoes to an ice bath. You'll notice the skins splitting.
Tomatoes will easily slip out of their skins.

We were able to fit all the toms into our biggest (5 gallon) pot.
Cover tomatoes with water and bring to a boil.

Be sure to stir to prevent burning.

Gently boil tomatoes for five minutes.

Ladle hot tomatoes into hot jars. Add salt and lemon juice.

Wipe rims, adjust lids and place in boiling water bath.

Cool jars for 12 hours. Remove rings, wipe down jars and store in a cool, dark place.

Tomatoes Packed in Water
From The Ball Blue Book
Click here for step-by-step water bath canning information

2 1/2 - 3 1/2 lbs. tomatoes per quart
Citric acid or bottled lemon juice
Salt (optional)

Prepare tomatoes: Wash tomatoes. Lower tomatoes into a large pot of boiling water. Blanch 30-60 seconds. Remove to a bowl of cold water. Slip off skins. Leave whole or cut in half or quarters.

Place peeled tomatoes  a large saucepot. Add enough water to cover tomatoes. Boil gently for five minutes, stirring to prevent sticking. Add 1/2 teaspoon citric acid or 2 tablespoons bottled lemon juice to each quart. Pack hot tomatoes into jars, leaving a 1/2 inch headspace. Ladle hot cooking liquid over tomatoes, leaving a 1/2 inch headspace. Add 1 teaspoon salt to each quart, if desired. Adjust lids and process quarts 45 minutes in a boiling water-bath canner.

Continue the conversation on Twitter
Want one-on-one preservation help? Find me on Helpouts