This was my second year attending the conference and I selected classes focused on bread baking and shaping, including instruction using a wood-fired oven. I make most of the bread we eat at home and wanted to learn new techniques, get better at making artisan loaves, and finally learn how to correctly slash dough using a lame!
While I accomplished two of those goals (still practicing the slash), I learned a tenet of artisan bread baking: time equals flavor. While fine-textured fortified bread relies on eggs, milk, butter or other ingredients for flavor (and have a short rise time), the ingredients in the bread I made included a pre-ferment (starter), yeast, flour, salt and water. Flavor and texture develop over time (up to three days for pizza crust).
Classes
Pretzels & Bagels from the Wood-Fired Oven
I wouldn't have thought of baking either of these items in a wood-fired oven but the result was chewy on the inside and crispy on the outside with tasty charred bits. Both pretzel and bagel doughs were made the day prior and allowed to ferment in the fridge overnight, then shaped. Bagels were boiled for 1-2 minutes then baked. Pretzels were dipped in a lye solution then baked.
 |
| Bagels removed from boiling water solution, topped with seeds then placed on a cornmeal-dusted peel. |
 |
| A sesame bagel fresh from the wood-fired oven. |
 |
| Traditional pretzels just out of the oven. |
Milling & Baking with Freshly Milled Flour
This class discussed the different types of grain and using fresh vs. aged flour. We also got a tour of the bakery and a primer on making decorative loaves.
 |
| Round loves rising in proofing baskets. |
 |
| Instructor and KAF Baker, Martin Philip, turns loaves out of the baskets to be loaded into the oven. |
 |
| Finished stencil. |
 |
| Before baking, loaves are decorated using a stencil and cocoa. |
 |
| Bread is quickly loaded in the oven. Each door is a separate deck. Steam is added to develop a crispy crust. |
Pizza is my favorite food. So I really enjoyed this class. A lot. Dough was made up to three days prior and allowed to ferment in the fridge. It was (tossed) thin, topped with sauce and a few other toppings and baked in minutes. I sampled them all, but my favorites included the pies topped with fresh, uncooked sauce. Fresh and light.
 |
| Andrew Janjigian, Assoc Editor for Cook's Illustrated starts with the crust. |
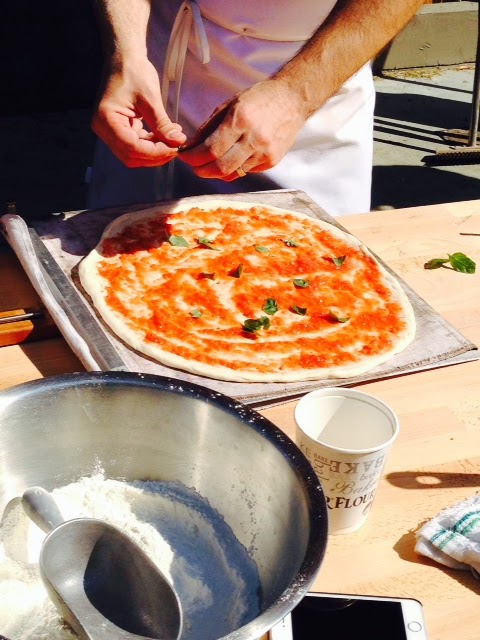 |
| Adding toppings. |
 |
| Baked in a hot wood-fired oven for just a few minutes. The charred crust was my favorite. |
Bakery Breads
Perfect baguettes are a baker's holy grail. This class taught me how to handle, roll and bake in a home oven. And I learned to curb my desire to add too much flour to aid in shaping. If repeating a task 10,000 times makes you an expert, I only have 9,998 more loaves to make.
 |
| See the baker's hands? That's how to roll a baguette. Fingertips and heels of the hand should remain on the bench. It's being done correctly if you can hear a "swooshing" sound as your hands remain in contact with the bench as you roll. |
Best part of the experience? Baking for two days with my nephew, Kyle!

My goal is to practice by making artisan loaves (or bagels/pretzels) a couple times each week for a year. And envision my backyard with a wood-fired oven. What food skills are you trying to perfect?
Baguettes
From King Arthur Flour
Poolish:
1 1/4 cups (5 1/4 oz) all-purpose flour
5/8 cup (5 1/4 oz) cool water
pinch of yeast
Final Dough:
2 3/4 cups (11 oz) all-purpose flour
3/4 cup (6 oz) cool water
1 1/2 teaspoon yeast
1 1/2 teaspoon salt
For Poolish: The night before you're ready to bake, combine poolish ingredients until blended. Cover bowl tightly and let poolish ferment for about 15 hours at 70 degrees. When it's ripe, the poolish should be very bubbly and fragrant.
For Final Dough: When poolish is ripe, add the flour, water, yeast and salt and stir to combine into a cohesive mass. The dough should be somewhat sticky, so you may need to add a bit more water.
Turn the dough onto a smooth, unfloured surface to knead. Resist the temptation to add more flour. After a short time the dough will smooth out and feel less sticky. (You can also knead on the medium speed of a mixer for 3-4 minutes.) When the dough is smooth and elastic, return to the bowl and cover well to rise. Let rise 1 1/2 hours folding once after 45 minutes (or more often of the dough is very slack).
Divide dough in two and pre-form rounds. Lest rest, covered, for 20 minutes. Shape into baguettes. Place shaped bread, seam side down on a couche or a lightly floured tea towel and let proof, covered, until not quite doubled 30-40 minutes. While dough is proofing, preheat oven and baking stone to 500 degrees.
Place the risen loaves on parchment paper, on a peel and slash. Slide baguettes onto the stone. Fill the oven with steam (place cast iron or other pan on lower rack during preheating. Pour boiling water quickly into pan after placing loaves on stone). Bake until the crust is well caramelized and the sides are very firm, about 25 minutes total.
No comments:
Post a Comment