Tuesday, October 28, 2014

Fall Garden Cover Crops

Hi friends! Chief gardener John here. It's the time of year when we do a final clean up of the garden. This generally involves trying to remove weeds and other plant refuse and plant a cover crop.  We're a big fan of using winter covers to suppress early spring weeds, reduce erosion and improve soil health.

If it's dry enough I'll do a light tilling and plant a winter cover crop. If the ground is wet I might scratch up the ground with a disc, spread the seeds and use a hand rake to work in.

There are many varieties of cover crops, each with different uses depending on the needs of your soil. This year I planted winter rye in both the small kitchen garden and in the large back garden. By the end of November a general cover is established, and next spring the rye will cover the garden. Be aware that rye can begin to form seeds heads quickly in the spring. Keep an eye out and be sure to terminate before heads form. Most experts suggest that, in order to preserve the soil structure, soil should not be tilled. As you can see, we're still trying to implement that technique.

Goodnight and sweet dreams until next year garden, thanks for all your hard work!


Rye seeds

Rye seeds spread on soil.

Rye sprouting after one week.
High tech seed spreader.  I can spread seeds over the garden plot in picture below
 in about 15 minutes.  As long as the seeds have good soil contact
they will sprout without working in.  
Large garden plot.

Spreading seeds with little hand cranked spreader.

Rye  from May of 2014 planted Fall of 2013.
I usually leave a little rye to grow this tall and
then cut it down with a hoe and let dry and
place between veggie rows as mulch. 
How do you prepare your garden for the winter? 

Monday, October 27, 2014

The Compost Pile

Our compost pile is near the back of the property close to our larger garden plot. The pile includes yard and garden waste, kitchen scraps (excluding meat, bones, cheese, etc.) and some paper products (grocery bags, newspaper).  

Apparently the pile doesn't get hot enough to kill produce seeds but stays warm enough to protect seeds from polar vortex temperatures. This year's cozy pile produced tomatillos, an array of pumpkins and squash, including a pumpkin cross we've never grown, cosmos and other surprises.  

The size of the pile prevents us from frequent turning, but this week our neighbor came over to bush hog some of the overgrown property. When we noticed the bucket on his tractor we asked him to turn the pile. Below is a before and after shot. Looks like the pile will break down in time to spread on flower and vegetable plots next spring, which helps with our heavy clay soils.

Our compost pile that we start fresh each spring. Check out those strange pumpkins on the
left. They sprouted from the pile even though we've never grown them.
Just turned pile. By spring it will be broken down.
And the bush hog improves the appearance of the property!
How is your compost pile looking? Did it produce any interesting volunteers this year?


Saturday, October 25, 2014

Preserving Fresh Horseradish

Aside from herbs, horseradish is one of the last items we pull from the garden. Traditionally, horseradish is dug in months ending with the letter "r", before the ground freezes. While not shelf stable, ground horseradish combined with white vinegar will safely stay in the refrigerator for a year.

I prefer the smaller roots which are tender with good flavor without the sinus clearing/eye watering properties of the large roots. Additionally, leaving larger roots behind ensures a horseradish harvest next year.

To grind, I recommend the use of a food processor. I've used a box grater but a processor grinds the woody roots finer and controls the odor.


Horseradish is a perennial. Leaving a few roots will ensure next year's harvest. 

This is about the size of roots I like to grind. The bigger the root the more heat.
Remove dirt and green tops from roots and peel using a vegetable peeler. 

 Coarsely chop roots and place in the bowl of a food processor.
Adding a small amount of white vinegar will help the roots break down. Pulse a few times,
then let the processor run, stopping to scrape the sides occasionally. 

Process until root is finely chopped. Be careful when lifting the lid as ground horseradish
emits strong vapors which can cause coughing and  eye watering.

Cover horseradish with white vinegar in a jar with a tight fitting lid.
Store in refrigerator for up to a year. 
Most of our processed 'radish goes into homemade horseradish sauce, which is a perfect accompaniment to roasted or grilled beef and pork, roasted vegetables and deep fried foods.

Horseradish Sauce
1/2 cup mayonnaise
1/2 cup sour cream
3-4 Tbsp ground horseradish, depending on taste
Salt & pepper to taste

Combine all ingredients in a small bowl. Enjoy!

Sunday, October 19, 2014

Processing Pumpkins

One of my favorite garden goodies is pumpkin. Not the carving kind, but the sweet, delicious baking kind. Each year I browse the seed catalogs looking for new varieties of pumpkins to use in pies and other baked goods. Two of my favorites are Musquee de Provence and Long Island Cheese pumpkins.

Commercially canned pumpkin is nothing more that pureed pumpkin flesh. The homemade version is easy to make and preserve, and tastier. When selecting pumpkins, look for pumpkins labeled "pie" or "sweet". Seed catalogs will indicate pumpkin use and often suggest which varieties are best for baking.

Some recipes suggest preparing the flesh by boiling or steaming the pumpkin. I prefer roasting as it intensifies the flavor without adding additional moisture.

Once roasted and pureed, the pumpkin may need to be strained (some varieties have more moisture than others). Line a large strainer with cheesecloth or towel and allow to drain for an hour. Place drained puree in 2 cup containers (which is roughly equal to a 14 oz commercial can and the amount called for in most pie recipes) and place in the freezer. The USDA recommends pureed pumpkin be frozen, not canned.


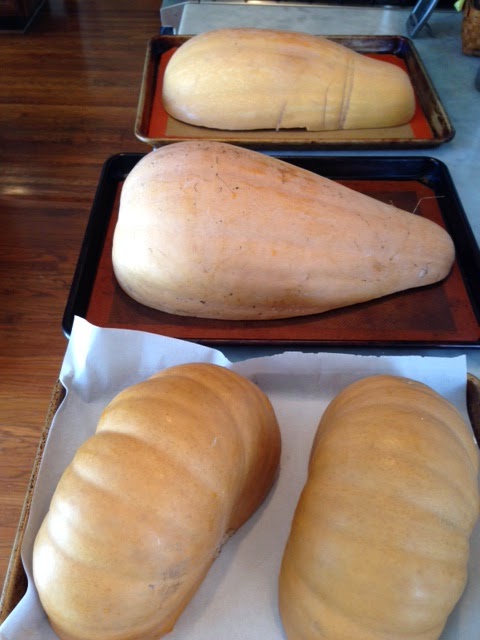
Right: Long Island Cheese pumpkin. Left: mysterious volunteer pumpkin. 
Could be a cross as we didn't plant or compost this variety. 
I'll roast to see if the flesh is suitable for baking.
To prepare for roasting, cut in half and scrape out seeds.

This large musquee de provence had to be cut into wedges to fit into the oven.
Place cleaned pumpkins cut side down on a rimmed baking sheet.
Roast at 375 degrees for about one hour.
Pumpkins are ready when flesh can be easily pierced with a paring knife.
The 
musquee de provence was roasted for 1 1/2 hours as the flesh is denser.
Roasted pumpkins. Use a tablespoon to scrape the flesh from the skin.
Unfortunately, the mystery pumpkin wasn't as tasty as
the other varieties, so I didn't include the flesh in the puree.

Puree the flesh in a food processor. Process until smooth.

Place puree in a lined colander and let drain for one hour.

I usually give the puree a final squeeze just before placing into containers. 
Place puree in 2-cup containers and freeze. Use within one year.

What do I do with all that pumpkin?
I make pies, cookies and pumpkin casserole
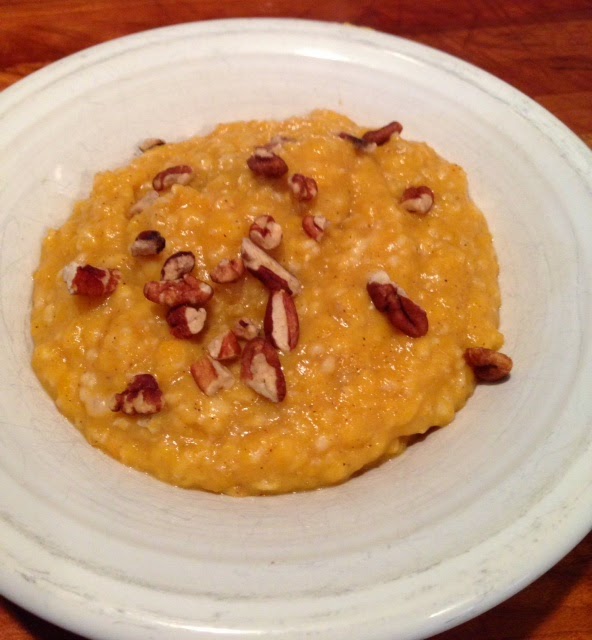
(similar to sweet potato casserole). But one of my favorite dishes is pumpkin oatmeal.
It's delicious, comforting and I like that I sneak in a vegetable for breakfast! 

Pumpkin Oatmeal
This makes a generous amount of oatmeal. I like to make a batch early in the week and refrigerate leftovers. Then I heat a portion in the microwave for a quick, nourishing breakfast throughout the week.

2 cups fresh pumpkin puree or 1 (14-ounce) can pumpkin puree
2 cups water
2 cups milk
1/4 teaspoon kosher salt
3/4 teaspoon pumpkin pie spice
2 cups quick cooking oatmeal (not the instant kind)
Optional toppings: Honey, maple syrup, brown sugar, cream, raisins, pecans, roasted pumpkin seeds

In large saucepan over high heat, combine the pumpkin puree, water, milk, salt, and pumpkin pie spice. Bring to a boil. Add the oatmeal. Turn the heat down and cook according to your oatmeal instructions (about 5 minutes). Stir often. Serve with toppings. Refrigerate leftovers.

Monday, October 13, 2014

Broom Corn Harvesting and Corn Shocks


Hello everyone, John here with some garden updates. Things are wrapping up for the season and it's been an interesting year. Last winter's polar vortex damaged or eliminated most of our tree fruit production - no peaches or pears. We had a lower than normal raspberry and blackberry production, but the new blueberries we planted are doing well.

Corn shocks are a favorite fall decoration, so every year I plant a packet of broom corn. A variety of sorghum, the stalks grow to 9 to 10 feet and along with the red seed heads, make striking decorations.
Getting ready to cut corn shock. Very easy to hand harvest.


Seed heads of broom corn, a variety of sorghum.  Maybe next year I will make some brooms.
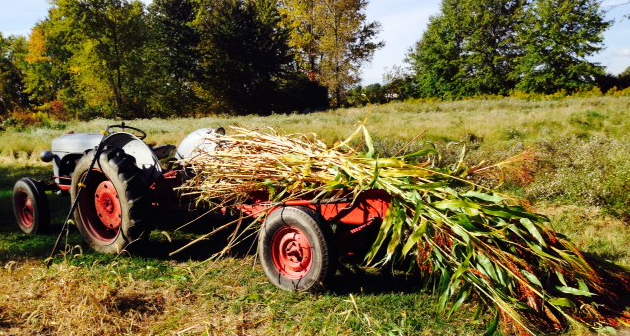
Broom corn loaded up on the wagon behind our old Ford 9N tractor.  
Enough shocks to cover six of the porch posts. Along with some of our pumpkins and squash.

Keep your eye out for our upcoming garden clean-up blog with an overview of cover crops we use to improve soil health. Happy fall!


Friday, October 10, 2014

Old School Dessert: Graham Cracker Pudding


Graham cracker pudding is a dessert I make for just the two of us - too provincial for company,  it's something we eat out of our everyday bowls (or salad plates, if nearby), scraping up the crumbs with our spoons (ahem, fingers). I was introduced to it during visits to Amish restaurants. I found a recipe in Bountiful Ohio (a cookbook devoted to recipes from Ohio food enthusiasts) and modified it slightly to suit our tastes.

Despite being a pudding, the recipe doesn't require tempering of eggs, or pre-baking of the crust. It comes together fast and is a real family pleaser. I mean, what's not to like about grahams and pudding topped with silky meringue?

This is a great dessert to make if you have extra milk on hand. I've used 1%, 2% and whole milk; all work well, although whole milk makes the creamiest pudding.

Combine crust ingredients and press into the bottom and halfway up sides of a 2 quart baking dish.
Tip: use the bottom of a glass to tightly pack the crumbs for a uniform crust.

Combine sugar, cornstarch and salt in a
medium saucepan. Add slightly beaten egg yolks.

Add milk and cook over medium heat, stirring constantly. Don't worry if you notice egg solids -
they'll smooth out as the pudding is heated. Bring to a gentle boil. Cook and stir one
minute longer (see video below for correct consistency).
Pour the pudding into the crust and prepare meringue.


For meringue, whip egg whites and cream of tarter just until frothy. Slowly add 2 Tbsp sugar and
whip until peaks form. Tip: whip egg whites in a stainless steel
or copper bowl to increase volume.

Meringue will be shiny but able to hold a peak.

Place meringue on top of pudding, making sure it touches the side of the baking dish.
Tip: add a decorative element by using spatula to draw up peaks.

Bake pudding at 375 degrees for 7-8 minutes. Meringue should be nicely browned.
Allow to cool, cover and refrigerate for at least three hours.

Because the crust isn't baked prior to filling,
it's more tender and looser than a traditional graham crust.

Graham Cracker Pudding
6 generous servings

Crust:
14 whole graham crackers, crushed
2 Tbsp sugar
1/4 cup salted butter, melted

Filling:
1/2 cup sugar
2 Tbsp cornstarch
1/4 tsp salt
2 cups milk
3 eggs, separated
1 tsp vanilla extract
pinch of cream of tartar
2 Tbsp sugar

Preheat oven to 375 degrees. Combine crust ingredients and press into the bottom and halfway up sides of a 2-quart baking dish. In a large saucepan, combine 1/2 cup sugar, cornstarch and salt. Slightly beat egg yolks and add to saucepan along with milk; mix well. Cook over medium heat until bubbly, stirring constantly with a heatproof rubber spatula until very thick. Remove from heat; add vanilla. Pour into crust.

In a mixing bowl, beat egg whites and cream of tartar until foamy; gradually add 2 Tbsp sugar. Beat until stiff peaks form. Top pudding with beaten egg whites, making sure meringue touches sides of baking dish. Bake 7 to 8 minutes or until lightly browned. Cool, cover and refrigerate at least 3 hours before serving.

What sorts of old school desserts do you make?

Wednesday, October 8, 2014

Preparing winter squash

We had a great winter squash harvest this year, resulting in acorns, butternuts and a few varieties of pie pumpkins. Squash is one of my favorite side dishes. In addition to being flavorful and easy to prepare, fresh, uncut squash will hold for months (between 50-60 degrees is optimal).

Squash recipes are plentiful and I strive for the easiest preparation, which generally eliminates peeling. Many recipes calling for peeled squash can be modified to use squash roasted in and scraped from the skin.

Although they might not be much to look at, the butternut (l)
and acorn (r) squash are tasty fall treats.
To prepare, carefully cut in half and scoop out the seeds with a spoon.
Thoroughly sprinkle with salt and pepper.

Place squash cut side down and roast at 375 degrees for 25-30 minutes.

Flip squash cut side up and, if desired, stuff cavity. For the acorn squash, I made a bread stuffing
with apples and cranberries. The butternut was sprinkled with cinnamon. Brown sugar and butter were placed in the cavity. Return the stuffed squash to the oven for an additional 25 minutes.

Finished squash. Comforting, filling and healthy!

You can bake squash cut side down for 45-50 minutes, scrape flesh from skin and mash for a casserole. I added a a bit of butter, nutmeg and a drizzle of maple syrup. This is a great Thanksgiving side that can be made the day before and heated in a 375 degree oven for 30 minutes (while the turkey rests). Roasted flesh can also be used as a base for cream soup.

Squash Stuffing
1/4 cup onions
1/4 cup celery
2 Tbsp butter
1 cup dried bread cubes
1/4 cup dried cranberries
1 small apple, peeled, cored and cubed
2 slices of bacon, cooked and crumbled (optional)
1 tsp dried sage or 2 tsp fresh sage
1/2 cup chicken stock, vegetable stock or cider
Salt & pepper, to taste

In a small saucepan cook onions and celery in butter just until softened, about five minutes. Combine sauteed vegetables with bread cubes, cranberries, apple, bacon, and sage. Add stock/cider, stirring to moisten ingredients.  Divide stuffing evenly between four partially baked acorn squash halves. Return to oven and bake at 375 degrees for 25-30 minutes.

Leave a comment with your winter squash preparation tips!

Monday, October 6, 2014

Freezing Peppers

We recently harvested the rest of the produce from the garden, including the last of the sweet peppers. One of the easiest foods to preserve, peppers can be frozen whole (core & remove seeds) or chopped. I chop in fairly large pieces, seal in a freezer bag and place in the freezer. No need to blanch.

Frozen peppers make quick work of dinner. I typically run under cool water for a few minutes and toss into the cooking pan. My favorite fast meals using peppers include sausage & pepper sandwiches and baked penne (with our canned tomatoes). While I depicted sweet peppers, the same method can be used with hot peppers. Frozen peppers should be consumed within one year.

Last sweet peppers from the garden.

Chop peppers to the size you prefer and place into freezer bags.
We use a vacuum sealer to eliminate freezer burn.

Place bags into freezer and consume within one year.

Here's my favorite quick pasta sauce that I use to make baked penne. I substitute fresh herbs in the summer. Feel free to add more (or hot) peppers to suit your taste.

1 small onion, chopped
1/2 cup chopped sweet peppers
olive oil
1-2 cloves garlic, minced
1 quart home canned tomatoes, with juice
2-3 Tbsp tomato paste (depending on how thick you like your sauce)
1 Tbsp dried oregano
1 Tbsp dried basil
2 tsp sugar
Salt & pepper to taste

Saute onion and peppers in olive oil in a large pan until softened, 5 minutes. Add garlic and cook for one minute. Add tomatoes, paste, herbs, and sugar. Bring to a simmer and cook for 5 minutes. Finish with salt and pepper to taste. 

To make baked penne, toss with 12 oz cooked penne or ziti noodles. Meat eaters can add pepperoni or cooked Italian sausage. Pour into a greased casserole dish, top with shredded mozzarella and bake at 400 degrees for 18-20 minutes or until brown and bubbly.

What do you make with your frozen peppers?